
It’s time to take action!
In this module you’ll learn the first method.
Native ads and CPA offers can be a powerful combination and the lessons below will show you the most advanced and profitable way to use both together.
Module lenght: 01:34:29
Additional notes on Outbrain
==> Event-Based Conversion
– When integrating Outbrain with your tracker, you’ll need to add Outbrain’s postback URL to your tracking set up. In order to do that, you’ll need to include the name of your Outbrain convrsion in the postback URL. That conversion is something you can create on Outbrain and this tutorial shows exactly how to do it.
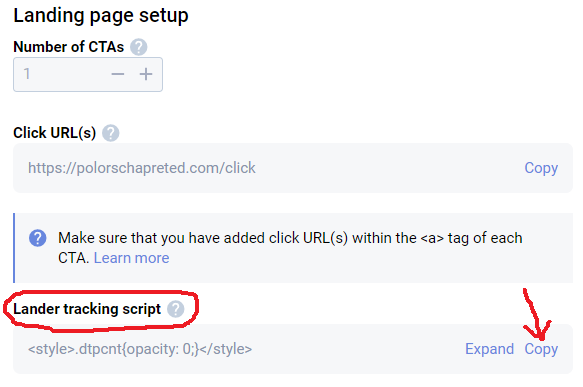
Additional notes on Voluum
==> Landing page
– When you set up a landing page on Voluum, this is the code it will provide for you put in the cource code of your lander (before the </body> tag).
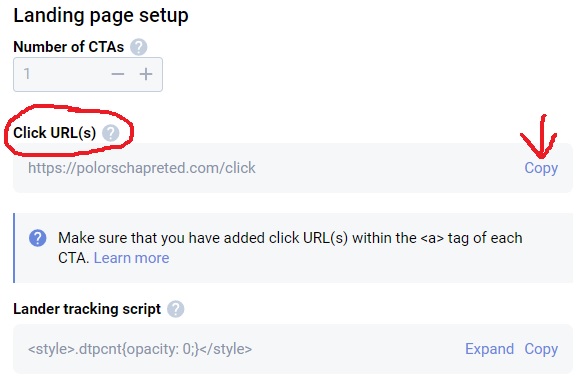
==> Landing page
– When you set up a landing page on Voluum, this is the link you should have in your call-to-action (it will redirect to your affiliate link)
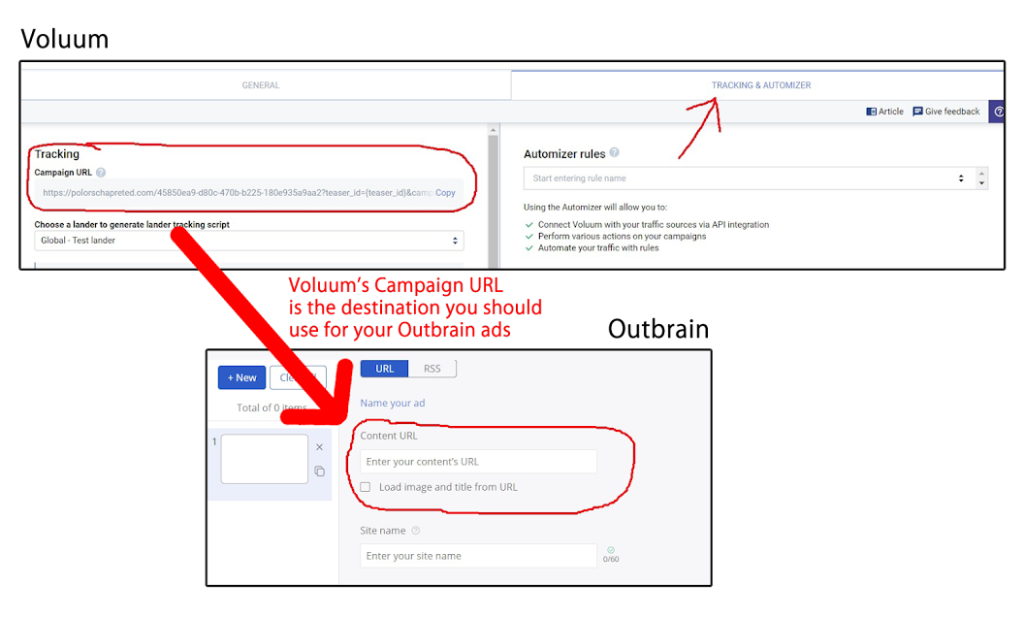
==> Campaign
– After you set up your campaign on Voluum (must set up traffic source, affiliate network, lander and offer first), click to edit the campaign, choose the “Tracking” tab and copy the link that you’ll use with your ads. This is the link that you’ll submit in the traffic source (you won’t submit your landing page’s link directly)
Additional notes on TheOptimizer
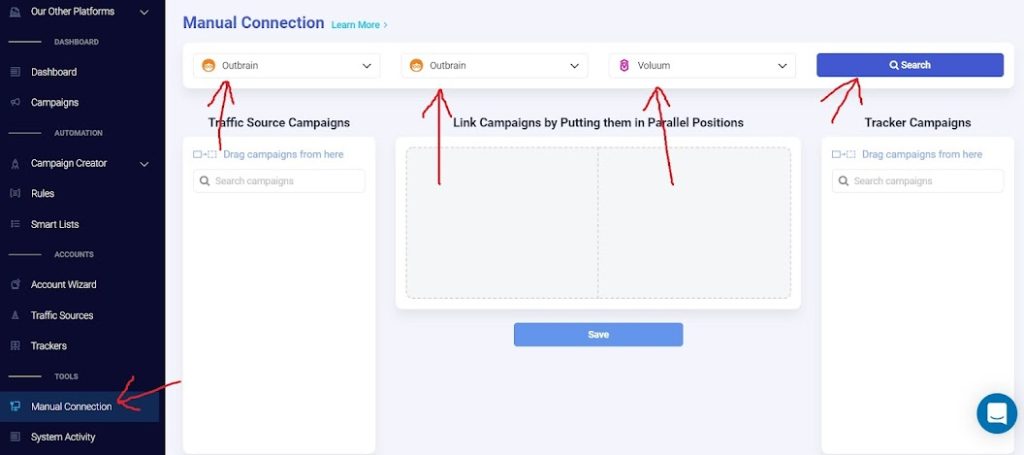
==> Connecting campaigns
– After setting up your campaign on Voluum and Outbrain, you need to connect them on TheOptimizer for the automation rules to be applied. See the screenshot below. You’ll see your Outbrain and Voluum campaigns there. Just drag and drop them and put them in parallel to connect them.
Useful tutorials
– Connecting Voluum and Outbrain
– Connecting Voluum and MaxBounty (similar for any CPA network)
UPDATE: Voluum Automizer
You can also use Voluum Automizer for automating your campaigns. In fact, if you’re using Voluum for tracking this is the best tool for you.
See the update for the automation lessons HERE.

Hi William, when checking out offers for method 1 Native what payout amount do you really go after? Is $3 and above your rule of thumb?
@Mitchell – There’s not a specific rule for the payout. The idea is that you use the research method to find campaigns that might have potential… anything that seems to be profitable is interesting for you to try!
Hi William, I’ve gone through the method 1 training and there’s one thing I’m still confused about. During the campaign creation on Outbrain you select a conversion. I did some research I think I figured out that you need to create a conversion based on URL or event based on your Outbrain pixel. Is that correct? I probably missed it, but in which video did you create this? How do you create this (which event?) and where do you place the Outbrain pixel for your campaign to optimize on this conversion? I hope my questions make sense…
@Mitchell – Yes, you need to create an “Eevtn-Based Conversion” on Outbrain. Here’s how to do it: https://www.outbrain.com/help/advertisers/server2server-integrations/
You can add the pixel to your landing page’s source code before the closing head tag.
Check! Thanks
He William, I got Adplexity and I’m doing some research the way you showed in the video. I’m finding many CPS offers, but I always understood that you need a lot more budget to test those. You haven’t gone that much into the type of offers. While researching ads, landers, and offers, are we looking for lead-gen types of offers for the method 1 strategy? Thanks
@Mitchell – You can promote both CPS and CPL offers. CPS offers may require a better budgte, but free trial offers or offers that have a low cost for the end user and a higher commission for the affiliate tend not to be hard to run with this method. And they can be very profitable, too!
I would really like to see a checklist overview of Method 1 (Native Ads), such as: (1) join AdPlexity, (2) search for ‘interesting’ ads (7-60 days, 3 months), (3)view landers and affiliate offers shown, (4) find same or similar CPA offers via OfferVault or ODigger, (5) request to run the offer by joining the Affiliate Network, (6) copy Landing Page from AdPlexity (to HTML or export to LanderLab Pro), (7) Setup Campaign in Voluum, (8) use Voluum’s custom domain for tracking, (9) setup Landing Page domain name, etc….
Feeling so overwhelmed with the technicalities of setting up my first campaign! So many hoops to jump through! I finally found an offer on AdPlexity, but it’s a CPS not CPL offer. Finally got approved to run it from a small affiliate network. Now I’m stuck on what to do next. I have Voluum and LanderLabPro and will run traffic via Outbrain. There’s a lot of technical stuff to setup and its a bit overwhelming. PLUS what about domain names? Pre-Landers? Etc. Yikes.
@Richard – Thanks for the suggestion! I’ll work on that. For now, you can follow the tasks in the exact order that they’re shown in the video. And if you have any questions or need help, don’t hesitate to reach out!
@Richard – Voluum has great, detailed tutorials. They’re really all step-by-sep. For example, if you search on Google for “Voluum Outbrain” (without quotes), you’ll find a detailed tutorial with screenshots showing how to add Outbrain to Voluum. Same for adding the landers, affiliate networks and offers. Once you’re done adding the elements, you can set up a campaign on Voluum (Voluum also provides a tutorial for that and you’ll find it if you search for “Voluum create campaign”), get the links and run the campaign on Outbrain. Any questions you have in the process, don’t hesitate to contact me!
Is there a video that shows how to optimize the ads themselves? If I’m understanding the videos, the automation tool will pause and optimize publishers or widgets. Would we be using our tracker to evaluate the specific ad information and landing page information?
@Paden – Most automation tools will allow you to apply rules for ads as well. But, yes, you can optimize ads and landers according to the reports generated by your tracker.
That’s very helpful. Thank you! Are there any basic rules we should start with in our optimization tool for our ads?
@Paden – You can start by manually removing bad performing ads. I normally stick with the 4 or 5 top CTR / lowest CPC ads and keep rotating the others (dropping bad ones and uploading new ones).
Do the same automation rules work on CPS campaigns? Or do you need to give more leeway before pausing a widget? If so how do you determine what the automation rules should be?
@Stephen – Rules are the same, but if the offer has a considerably higher payout and a sale is required for the conversion to take place, it may be a good idea to increase the amounts for the rules. You can increase by 2x or 3x depending on your payout.
Great Thanks! 1 more question…when running campaigns that have lots of potentially profitable GEOs do you do 1 campaign per GEO or just run a bunch in 1 campaign and allow the tracker to determine which GEOs are profitable.
@Stephen – I always use 1 GEO per campaign. If I promote 1 offer to multiple GEOs, I’ll use multiple campaigns and optimize them seprately.
Just a quick FYI to everyone: I went on a demo call with Voluum and got a 3-month prepaid deal with them including the Automizer (so I am not going with the Optimzer.io, but no worries). That got my monthly cost down to $499. It’s the Business Start-Up account with all the necessary things to get going and enough support to get everything setup. If you are serious that might be worth checking out.
Also, in the call I was very open and honest with them about starting out, getting help from William and what my ad budget is, etc., which helped get the 3 month deal.
Also, in setting everything up inside of Voluum I setup Outbrain and Taboolah as a traffic source. Both were no problem at all to get the API from. I got the API from both sources within 2 hours of asking. For Taboolah I just followed the documentation from Voluum and for Outbrain I followed William’s video instructions.
@Max – Thanks for sharing, Max!
Voluum is now at $199/month for the individual plan, quite unaffordable when starting out. Is it okay to use Bemob to start with as an alternative?
@Jamie – Yes, they have increased their price. However, it already comes with the Automizer, so you can cut off on the expense with the automation tool. But, yes, you can definitely start with BeMob as explained in the training