Outbrain

Task 7: Optimize your campaigns

OBJECTIVE

Optimize your campaign to improve ROAS and make it profitable.

TRAINING

This is the most important step of the process.

It’s crucial that you understand that NO CAMPAIGN BECOMES PROFITABLE WITHOUT PROPER OPTIMIZATION.

To understand how optimization works and why it’s important, you first need to understand how Outbrain generates traffic for you.

Outbrain has a network of publishers, which are websites and apps that display Outbrain ads.

It means that, as soon as your campaign starts running, your ads will start being displayed on those websites and apps (the ones that fit your campaign targeting, of course).

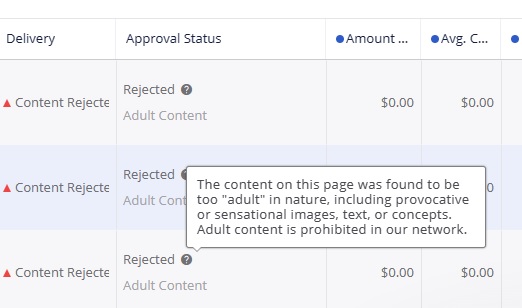
However, not all websites and apps will have the same performance. Some of them will generate conversions for you, but others (most) won’t.

In order to make your campaign profitable, you’ll need to filter out bad publishers.

Also, your ads won’t have an equal performance. Some of them will perform well and others won’t, which means you’ll need to filter out bad ads, too.

For you to get rid of bad publishers and ads and properly optimize your campaigns, you’ll need to implement certain optimization rules.

Rules should be implemented constantly. You can apply them to your campaign more than once a day.

It’s also an optimization rule that will determine when you should pause a campaign and move on.

And, yes, this ca happen. Not every campaign is a winner. We can’t predict for sure which campaigns will be profitable and which ones will be losers.

Having the right process ensures that you can always find some winners when testing campaigns, but it won’t give you super powers to predict the outcome of a campaign with 100% accuracy before even running the campaign.

On average, 1 out of 3 or 4 campaigns turns a profit.

We call those campaigns winners.

One winner can be scaled to 3 or even 4 figures a day, generating hundreds or even thousands of dollars in return for every buck spent on testing the losers.

The idea of this game is to lose small and win big.

Ok, ready for learning the optimization rules?

If so, hit the play button and watch the video!

    COMPLEMENT

    No complementary lessons are necessary.

    WHAT’S NEXT?

    Congratulations on completing this training module!

    The next step now is to set up more campaigns.

    Create and test more campaigns and you’ll soon have a bunch of winners for scaling and profiting from.

    Task 6: Set up your campaign

    OBJECTIVE

    It’s time to take action! Now, you’ll set up your campaign on Outbrain and start getting traffic.

    TRAINING

    This is a step-by-step video on how to set up your ads on Outbrain.

    The video is a bit long, but make sure to watch it in full to avoid mistakes.

    Audience targeting

    You can start with full audience as shown in the video. However, if you’d like to start with the lowest budget possible and your campaign is in a popular niche, you can select “Outbrain Interests” and select interests that fit your campaign.

    When running a native ad campaign, you’ll be optimizing it based on individual publishers.

    Your ads will be displayed across a huge network of publishers (websites and apps). Some of those publishers will be good and others will be bad. So, you can start with broad targeting (Outbrain will optimize it for you) and just filter out bad publishers (you’ll learn how to do this in the lesson about optimization).

    By using interests, you can get a little more precise with the publishers initially and reduce the amount you’ll spend on bad publishers. The drawback is that your interests may left out publishers that would be good and that you’d find with a broad campaign.

    Still, if you want to spend the least amount possible in the beginning, it’s probably a good idea to use interests when you can find suitable interests (otherwise, just go with full audience).

    Ad rejections

    Compliance is important on any ad platform nowadays.

    It’s possible that your first ads will be rejected. It happens all the time and it’s not a big deal.

    All you need to do is to fix the problem and submit new ads.

    Outbrain will always show you a reason for rejection like this:

    Image Not Found

    These are common reasons for rejection and their respective solutions.

    Navigation problem

    CPA networks have a feature called “geo-redirection”. This feature redirects people away from the offer when they click the affiliate link, in case they’re not in one of the “allowed countries” (countries that the advertiser that owns the offers wants to get traffic from).

    Sometimes, this feature can interfere with the approval process.

    For example, suppose an offer allows traffic from the US only.

    If an Outbrain reviewer located in Canada verifies your landing page and click the button, they won’t see the offer. They may see an unrelated offer or even a blank or error page.

    This will make them reject your offer.

    Solving this problem is very simple.

    First, find a random website in your niche. For example, if you’re promoting a loan offer, just search for “loan” on Google and click one of the websites that will show up.

    Next, copy the URL of that website, which most likely won’t have geo-redirection and will load for any user in any country.

    Then, go to BeMob (or the tracker you’re using) and edit the offer there:

    Image Not Found

    Then, replace the affiliate link and the URL of the random website in your niche and click “Save”:

    Image Not Found

    After this, resubmit your ads.

    Once they’re approved, just keep them paused on Outbrain, return to BeMob and edit the offer again to place your affiliate link back.

    Finally, activate the campaign.

    No “advertisement” disclaimer

    Oftentimes, Outbrain requests that landing pages have a disclaimer on top.

    It’s very simply, you just need to have a discreet (but visible) ADVERTISEMENT on top.

    When using CPA Tools, this is super easy.

    Just go to CPA Tools, click to edit your landing page and check the box to enable the advertisement disclaimer. Click “Next” and then “Submit” (you need to click the submit button for the changes to apply).

    Once done, delete the ads and submit them on Outbrain again.

    Compliance problems

    You may have compliance issues if you use something in your copy that Outbrain considers to be inappropriate according to their ad policies.

    If it happens, to keep trying to resubmit the same ads and landing page.

    Make changes according to their request and only then resubmit the ads.

    Common Mistakes To Avoid

    • Using similar ads – Initially, use very different images and copy. When you find something that stands out, then test variations of it.
    • Targeting multiple countries – It should always be one country per campaign.
    • Bidding too high – You don’t need to bid too high. I suggest that you start with the lower end of what Outbrain recommends or even a bit lower than that. If you don’t get volume (impressions), increase the bid gradually until the campaign starts to get impressions.

    COMPLEMENT

    No complementary lessons are necessary.

    WHAT’S NEXT?

    Create your campaign on Outbrain.

    Once you’re done, CLICK HERE to go to the next task.

    Task 5: Configure tracking

    OBJECTIVE

    Here you’ll learn how to set up tracking for your Outbrain campaigns.

    TRAINING

    Tracking is crucial for native campaigns.

    No native ad campaign will start off with a positive ROI. All campaigns require proper optimization for becoming profitable.

    For doing this proper optimization, you’ll need to know where your conversions are coming from. You’ll need to find out what websites and placements are sending good traffic as well as what ads are performing better and what landing pages are pitching the offer more efficiently.

    This is exactly what a tracking tool will do for you.

    The main trackers in the market for using with native ad campaigns are Voluum, RedTrack and BeMob.

    BeMob is the only one that has a free starting plan. For this reason, we recommend that you start with it and avoid additional expenses before you make your first campaigns profitable.

    We also have a complete tutorial on setting up tracking with BeMob.

    Click here to check out the BeMob training module and learn how to configure it.

    You’ll need to integrate BeMob with Outbrain as well as with your landing page and CPA network.

    All the steps are covered in the BeMob training module. Watch the lessons there, follow all the steps and return to this training module once done.

    COMPLEMENT

    No complementary training is necessary for this task.

    WHAT’S NEXT?

    Go to the BeMob module, configure tracking for your native ad campaign and then return to this module.

    Once you’re done, CLICK HERE to go to the next task.

    Task 4: Create your Outbrain account

    OBJECTIVE

    Here you’ll learn how to create your Outbrain account.

    TRAINING

    Watch the video below to learn how to set up a new Outbrain account:

    COMPLEMENT

    No complementary training is necessary for this task.

    WHAT’S NEXT?

    Create your Outbrain account and add a credit card to it.

    Once you’re done, CLICK HERE to go to the next task.

    Task 3: Create a landing page

    OBJECTIVE

    Here you’ll learn how to create a landing page and use it to skyrocket the conversion rate of your campaign.

    TRAINING

    A landing page is an intermediate page between the ad and the offer.

    Instead of clicking the ad and going directly to the offer, your visitors will first go to your landing page and only after clicking the button on your landing page they’ll go to the actual offer.

    The landing page is one of the most crucial elements of a campaign for 2 reasons:

    1 – It can protect your account: most CPA networks have affiliates promoting their offers with spammy tactics. It leads the platforms (including Outbrain) to blacklist their links. Thus, if you submit an ad with a direct link to the offer, you may have your ad rejected or your account banned. On the other hand, if you use your landing page you won’t have problems.

    2 – It increases conversions: the landing page is where you have the chance to communicate with your audience and convince them to take the offer. Most CPA offers have very simple registration pages. The reason for that is because they need to suit traffic from all affiliates (each affiliate targets a different audience and uses a different traffic source). For example, suppose you’ll be promoting a gaming offer called “Game X”. In order to do that, you’ll be targeting the fans of a similar game, let’s say “Game Y”, and you’ll be pushing them to try Game X. Game X’s registration page won’t mention Game Y and won’t have any direct comparison between those 2 games as that’s your angle and not every affiliate is doing the same and targeting Game Y fans. Therefore, you need to use your landing page to connect the dots between Game X and Game Y and get Game Y’s fans interested in playing Game X. Only then you’ll send them to the registration page (Game X’s offer).

    Here’s a video to help you create killer landing pages:

    CPA Tools

    You can click here and log in into your CPA Tools account for creating your landing page.

    The password to access CPA Tools is the original one you received for this members area (even if you have already changed your password here).

    CPA Tools is included in your membership, so you won’t have any additional cost, but here are some important things to keep in mind:

    • CPA Tools is NOT a page builder. You won’t be able to use it build pages from scratch or change the structure of existing templates. CPA Tools is a software for setting up landing pages with preexisting templates (the same ones I use for running my own campaigns). The idea is that you can just change the color, image and copy, insert your affiliate link and have a landing page ready to use. In case you want to use your own software for creating landing pages, you can do it as your risk. Of course, it’s not a problem to create the pages with a different software, but the templates inside CPA Tools have been tested and validated. If you use other templates, it’s your decision.
    • Check out the tutorials. Right after you access your CPA Tools account, you’ll be able to scroll down and find multiple tutorials on your dashboard. Make sure to watch those tutorials to learn how to use the software.
    • Don’t use opt-in templates. CPA Tools can be used for list building campaigns as well, but it’s not what you’ll be doing in this module. When selecting a template, make sure that it doesn’t have the opt-in tag. The page you’ll create will be a simple bridge page with a button to the offer (your affiliate link). No integration with an autoresponder or opt-in form will be necessary.
    • Most templates fit any niche. The vast majority of the templates can be used in any niche. For example, you can select a template in the “dating” category and use it for a campaign that’s not related to dating. All you need to do is to change the image, copy and color scheme. Also, you’ll be able to select a domain in a different category.
    • CPA Tools provides hosting and domains. You won’t need to host your pages. Once you finish setting up a landing page, you’ll be able to start promoting it immediately as it will be on our server. In case you’d like to download the pages and host them on your server with your domains, it’s possible, but it’s not advisable that you do it unless you have the technical skills to do it.

    Common Landing Page Mistakes

    These are common mistakes that people make when creating their first landing pages. Pay attention to the items below and make sure to avoid the mistakes.

    • Poor landing page copy – do your best to write nice copy. Check out the complementary training lessons below, make proper research and put in some effort to create a landing page that will help you increase conversions. Creating any random landing page won’t make your campaign profitable, you need to create a good landing page. Here are examples of good and bad landing pages:
    Image Not Found
    Image Not Found

    More landing page examples…

    Image Not Found
    Image Not Found
    Image Not Found
    • Incomplete landing pages – Watch the CPA Tools tutorials, learn the purpose of each field and make sure to set up the landing pages properly. For example, never use the default URL, which will look like this /page_8467579834. Instead, replace it with a friendly URL such as /playrpg (it has to be related to your offer, obviously). Also, edit the page’s title as it is the title that shows up on the browser tab.
    • Sometimes less is more – Don’t use too much text and also avoid too extravagant backgrounds that can make it hard to read the text. Keep it simple and clear.
    • Don’t be lazy, don’t find excuses – If you’re doing it for the first time, check out the tutorials, analyze the examples and put in some effort to create a good landing page. Also, it may be necessary to make some research about your audience, your offer and other competing offers to come up with ideas. Take the time to do it.

    COMPLEMENT

    Here are some complementary lessons that will help you create better landing pages:

    WHAT’S NEXT?

    Create your landing page, analyze it, improve it and test it to make sure that everything is working fine.

    Once you’re done, CLICK HERE to go to the next task.

    Task 2: Find a suitable offer

    OBJECTIVE

    Here you’ll learn about the best offers to promote with Outbrain campaigns.

    TRAINING

    Check out this video and learn how to choose your offers.

    Additional tips

    Start with lead generation offers – although it’s possible to promote all kinds of offers with Outbrain, free lead generation offers can be significantly cheaper to test.

    Avoid complex niches – Gambling, CBD, crypto… avoid all those more complex niches.

    COMPLEMENT

    No complementary training is necessary for this task.

    WHAT’S NEXT?

    Search for offers on your CPA networks, contact your affiliate manager and check the networks’ newsletters and top offers selections, too. Then, choose an offer following the criteria shown in the video above.

    Once done, you can CLICK HERE to go to the next task.

    Task 1: Understand native campaigns

    OBJECTIVE

    Here you’ll learn how native campaigns work and how you can make money with them.

    TRAINING

    Check out this video and learn how you’ll be running campaigns on Outbrain.

    COMPLEMENT

    No complementary training is necessary for this task.

    WHAT’S NEXT?

    Just watch the video above, learn more about Outbrain ad campaigns.

    Once done, you can CLICK HERE to go to the next task.

    Introduction to Outbrain

    OBJECTIVE

    Outbrain is a powerful native ads platform and here you’ll learn how to use it for promoting CPA offers.

    TRAINING

    Watch the video below to learn the basics of Outbrain ads.

    COMPLEMENT

    No complementary training is necessary for this task.

    WHAT’S NEXT?

    Easy one… no need to do anything here.

    After you watch the video, you can CLICK HERE to go to the next task.

    Preparation: How to take action

    DO NOT SKIP THIS – Read carefully before you get started

    Welcome to our training on Outbrain!

    In this training you’ll learn a proven method for promoting CPA offers on Outbrain.

    Important things to keep in mind:

    * We will be covering Outbrain specifically here, not all native ad platforms. We do have other training materials covering other native platforms.

    * Not every campaign will be profitable. Once you learn the process, you can repeat it a few times to create multiple campaigns and find many winners.

    Now, let’s talk about the best way for you to implement this training module and achieve results.

    First, follow the lessons in the order that they are presented to you.

    The module is in a task-by-task (or step-by-step) format. Inside each lesson you’ll find 4 elements:

    OBJECTIVE
    The objective of the lesson will be right on top and it will tell you exactly what you’re supposed to accomplish with that lesson.

    TRAINING
    The training will show you, in details, how to achieve the objective. What to do, where to clicks, what to avoid, etc. You’ll have clear directions and demonstrations to follow.

    COMPLEMENT
    The complement will be one or more additional training lessons. They are not mandatory, but can help you execute the task more efficiently.

    WHAT’S NEXT?
    This part will tell you what to do next and how to move on to the next task.

    Go through the lessons one by one. Be patient and persistent. Take the time to study the lessons, watch the videos and complete each task carefully.

    When you complete all the tasks of this module, you’ll have a campaign up and running on Outbrain.

    For creating other campaigns, just repeat the process.

    When you go through the tasks for the first time and create your first campaign, the process will be slow as you’ll be learning it.

    Once you’re familiar with the process and start creating more campaigns, you’ll be able to execute the tasks much faster.

    If you have questions or need help during the process, get in touch with the support.

    For regular questions, please, use the community. First, search for similar questions as someone may have already asked the same question and you may get an instant answer. If it’s not the case, create a new topic (don’t use an existing one) and post your question. We will get back to you asap.

    If you have a private questions that involves sharing data from one of your campaigns, use the support section.

    Don’t send support requests by email or on social media. If you do that, you won’t get a reply. You need to use the support section here in this private area.

    WHAT’S NEXT?

    You’re now ready to start your Outbrain journey!

    CLICK HERE to go to the introduction to Outbrain ads!